
If you're searching for a trendy, handmade crochet bag that combines style, space, and a touch of bohemian charm – you're in the right place! The Boho Bliss Crochet Bag is your next must-make project. Whether you're headed to the beach, the market, or just out with friends, this roomy tote adds a statement to any outfit. With easy stitches, clear instructions, and eye-catching details, it’s perfect for beginners and seasoned crocheters alike.


• Size: Approx. 27 cm (length) x 12 cm (width) x 21 cm (height)
• Style: Boho, modern, and casual
• Uses: Everyday tote, beach bag, market bag, or stylish accessory
• Hook: Use a crochet hook suitable for your chosen yarn (usually 6 mm to 8 mm for macramé or T-shirt yarn).
• Trim: 50 cm of colorful tribal ribbon or fringe.
• Decor: Mini pom-pom trim (peach or any color you like!)
• Extras: Yarn needle and scissors


2. Body: Continue working in the round with single crochet stitches to build the height of the bag.
3. Handles: Crochet integrated handles for a seamless and strong finish.
4. Finishing Touches: Attach your colorful ribbon trim with pom-poms for that unique boho vibe.
This project works up quickly and delivers beautiful, professional-looking results!
• Single Crochet (sc)
• Slip Stitch (sl st)
• Magic Circle (mc)
• Half Double Crochet (hdc)
• stitch(es) (st)
• [ ] : work directions in brackets the number of times specified
• ()*: repeat directions in parentheses the number of times specified
Special stitch
Shell (1-2-1 hdc): hdc in the 1st ch, ch 2, hdc in the 2nd ch.
1. Wrong Side Rows (Rounds 2, 4, 6): Work half double crochet (hdc) stitches by inserting the hook into the 3rd hidden loop at the front, just under the front loop. This technique creates beautiful ridges and extra stability.
2. Right Side Rows (Rows 3, 5): Work into the back loop only (BLO). This adds flexibility while keeping the shape firm. These alternating rows create a textured and sturdy base perfect for carrying your everyday essentials.
3. No Joining: Work in a continuous spiral — there’s no need to join with a slip stitch or chain at the beginning of each round. Just keep going as if you’re working one long spiral.
4. Unique Single Crochet: Instead of traditional sc, you’ll insert the hook through the legs of the indicated stitch (also called “split single crochet” or “waistcoat stitch”) to get a firmer texture.
This technique gives the bag a clean and polished look while keeping the fabric dense and durable.
Round 1: ch 2 (ch2 is counted as a hdc), hdc in the 4th ch from hook and in the next 17 chs, shell 2 in mc, turn sideways and continue along other side of the foundation ch, hdc in remaining loop of each of next 18 chs, shell 2 in the last ch, join with sl st in top of turning ch2.
Round 2: turn, ch 2, (shell, hdc 2, shell)*, hdc 20, repeat * 1 time, hdc 19, join with sl st in top of turning ch2.
Round 3: turn, ch 2, dc 20, (shell, hdc 4, shell)*, hdc 22, repeat * 1 time, hdc, join with sl st in top of turning ch2.
Round 4: turn, ch 2, hdc 2, (shell, hdc 6, shell)*, hdc 24, repeat * 1 time, hdc 21, join with sl st in top of turning ch2.
Round 5: turn, ch 2, dc 22, (shell, hdc 8, shell)*, hdc 26, repeat * 1 time, hdc 3, join with sl st in top of turning ch2.
Round 6: ch 1, sc in the same st of ch, (skip 1 st, 2 sc in 1 st)*, repeat * to the end of round.


Notes
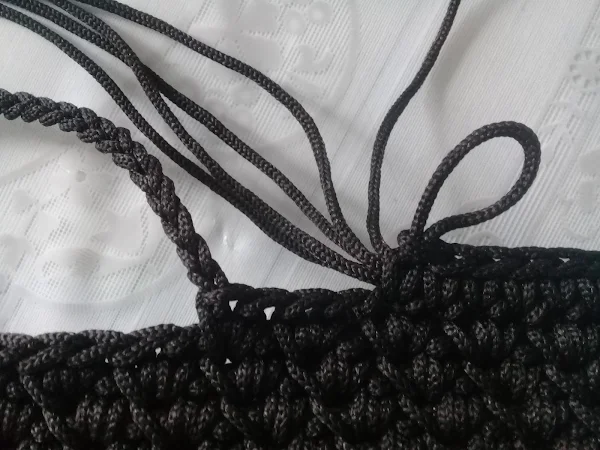
1. Work the single crochet as usual, but around 4 yarns as shown in the following photos.
2. Follow the following tutorial to join the last st to the first one to look as a continued chain without interruption.
Round 2: ch 1, sc in each st to end of round, join with sl st in the 1st sc.
How to work the last round
 How to join the last stitch to the first one
Cut the yarn, leaving a tail. Pull the yarn tail all the way through the last stitch to fasten off. Insert your hook into the first stitch of the last round, under both the front and back loops (as shown in the photo), and pull the yarn tail through.

 Then insert your hook into the back loop only of the last stitch (as shown in the photo), and pull the yarn tail through again.

 This creates a seamless finish, making the last round appear continuous and smooth.
Then, cut the yarn tail and weave it through the stitches on the inside (or back) of your work to hide it and secure the end. This will give your project a clean and professional finish.

This is a digital crochet pattern only. The finished product is not included.
The pattern is copyrighted by Sweet Sam Design.
You may sell finished items made from this pattern, but please credit the designer and link back to the original pattern.
📌 Pin it on Pinterest
📷 Share your creation on Instagram using #BohoBlissBag
💬 Leave a comment below to tell us how yours turned out!
Crochet your style. Craft your joy. Carry your creativity.
Happy crocheting!
This bag has been my favorite go-to accessory for years, and even now, I still get compliments every time I wear it! Its boho charm and playful pom poms give it that stylish, handmade flair that never goes unnoticed
Why You'll Love the Boho Bliss Crochet Bag
This bag is more than just a crochet project—it's a stylish accessory and a practical companion. Its textured body, colorful tribal-inspired trim, and playful peachy pom-poms make it stand out in the crowd. Whether you pair it with jeans and sandals or a flowing boho dress, it fits perfectly with any casual or festival look.Features of the Boho Bliss Crochet Bag
• Skill Level: Easy – great for beginners and experienced makers.• Size: Approx. 27 cm (length) x 12 cm (width) x 21 cm (height)
• Style: Boho, modern, and casual
• Uses: Everyday tote, beach bag, market bag, or stylish accessory
Materials You’ll Need
• Yarn: Macramé cord, T-shirt yarn, or any bulky-weight yarn that matches your desired texture and shape.• Hook: Use a crochet hook suitable for your chosen yarn (usually 6 mm to 8 mm for macramé or T-shirt yarn).
• Trim: 50 cm of colorful tribal ribbon or fringe.
• Decor: Mini pom-pom trim (peach or any color you like!)
• Extras: Yarn needle and scissors
Crochet Pattern Overview
This pattern is written in standard American crochet terms and includes clear, step-by-step instructions. It's easy to follow and ideal if you're looking to create your own handmade bag that looks store-bought but with a personal touch.Who Is This Pattern For?
This bag is designed for crochet lovers of all levels, especially those who enjoy stylish and functional accessories. Whether you're making it for yourself or as a handmade gift, this tote is a perfect choice. Plus, it’s a great product to sell at craft fairs or online shops.Basic Construction Steps
1. Base: Work in rows to create a sturdy rectangular base.2. Body: Continue working in the round with single crochet stitches to build the height of the bag.
3. Handles: Crochet integrated handles for a seamless and strong finish.
4. Finishing Touches: Attach your colorful ribbon trim with pom-poms for that unique boho vibe.
This project works up quickly and delivers beautiful, professional-looking results!
Stitches Used and Abbreviations
• Chain (ch)• Single Crochet (sc)
• Slip Stitch (sl st)
• Magic Circle (mc)
• Half Double Crochet (hdc)
• stitch(es) (st)
• [ ] : work directions in brackets the number of times specified
• ()*: repeat directions in parentheses the number of times specified
Special stitch
Shell (1-2-1 hdc): hdc in the 1st ch, ch 2, hdc in the 2nd ch.
Notes
Base (Worked in Rows)
To create a thick, structured base that holds the bag upright:1. Wrong Side Rows (Rounds 2, 4, 6): Work half double crochet (hdc) stitches by inserting the hook into the 3rd hidden loop at the front, just under the front loop. This technique creates beautiful ridges and extra stability.
2. Right Side Rows (Rows 3, 5): Work into the back loop only (BLO). This adds flexibility while keeping the shape firm. These alternating rows create a textured and sturdy base perfect for carrying your everyday essentials.
Body (Worked in Spiral Rounds)
The body of the bag is created seamlessly:3. No Joining: Work in a continuous spiral — there’s no need to join with a slip stitch or chain at the beginning of each round. Just keep going as if you’re working one long spiral.
4. Unique Single Crochet: Instead of traditional sc, you’ll insert the hook through the legs of the indicated stitch (also called “split single crochet” or “waistcoat stitch”) to get a firmer texture.
This technique gives the bag a clean and polished look while keeping the fabric dense and durable.
Written Instructions
Base
Make mc, ch 19 (mc is counted as a ch),Round 1: ch 2 (ch2 is counted as a hdc), hdc in the 4th ch from hook and in the next 17 chs, shell 2 in mc, turn sideways and continue along other side of the foundation ch, hdc in remaining loop of each of next 18 chs, shell 2 in the last ch, join with sl st in top of turning ch2.
Round 2: turn, ch 2, (shell, hdc 2, shell)*, hdc 20, repeat * 1 time, hdc 19, join with sl st in top of turning ch2.
Round 3: turn, ch 2, dc 20, (shell, hdc 4, shell)*, hdc 22, repeat * 1 time, hdc, join with sl st in top of turning ch2.
Round 4: turn, ch 2, hdc 2, (shell, hdc 6, shell)*, hdc 24, repeat * 1 time, hdc 21, join with sl st in top of turning ch2.
Round 5: turn, ch 2, dc 22, (shell, hdc 8, shell)*, hdc 26, repeat * 1 time, hdc 3, join with sl st in top of turning ch2.
Round 6: ch 1, sc in the same st of ch, (skip 1 st, 2 sc in 1 st)*, repeat * to the end of round.
Body
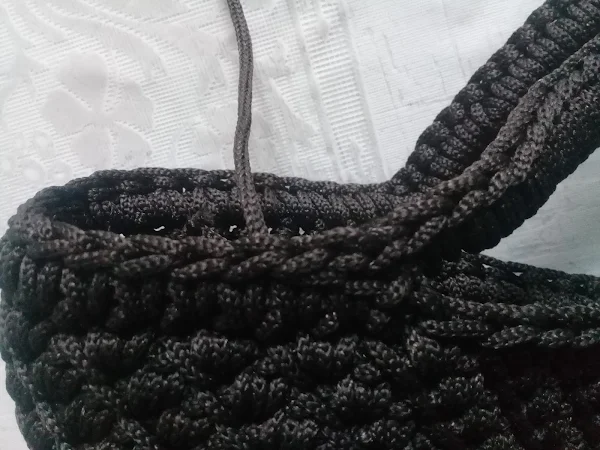
Skip ch st of previous round and make 2 sc in the 1st sc, (skip 1 st, 2 sc in 1 st)*, repeat * to the end (28 rounds as indicated in the following photo). Then, continue bag handles without cutting yarn.Handles
Round 1: (2 sc in 1 st , skip 1 st) 14 times, ch 27, skip 19 st, (2 sc in 1 st , skip 1 st) 12 times, ch 27, skip 19 st, join with sl st.Notes
1. Work the single crochet as usual, but around 4 yarns as shown in the following photos.
2. Follow the following tutorial to join the last st to the first one to look as a continued chain without interruption.
Round 2: ch 1, sc in each st to end of round, join with sl st in the 1st sc.
How to work the last round
Cut the yarn, leaving a tail. Pull the yarn tail all the way through the last stitch to fasten off.
Finishing Touches
The final step is to sew the pom-pom fringe across the top of your bag, leaving the last 4 rounds visible.Then, cut the yarn tail and weave it through the stitches on the inside (or back) of your work to hide it and secure the end. This will give your project a clean and professional finish.
Download and Use Rights
Please note:This is a digital crochet pattern only. The finished product is not included.
The pattern is copyrighted by Sweet Sam Design.
You may sell finished items made from this pattern, but please credit the designer and link back to the original pattern.
Need Help?
If you ever get stuck or have a question about the pattern, don't hesitate to reach out. I'm always happy to help fellow crocheters on their creative journey.Pin It, Share It, Make It!
Loved this project?📌 Pin it on Pinterest
📷 Share your creation on Instagram using #BohoBlissBag
💬 Leave a comment below to tell us how yours turned out!
Crochet your style. Craft your joy. Carry your creativity.
Happy crocheting!


No comments:
Post a Comment