
Are you ready to infuse a touch of rustic elegance into your decor? Crocheted leaves can be a delightful addition to your DIY repertoire. This creative and engaging craft project allows you to bring nature's beauty into your home, office, or event space. Whether you're a seasoned crochet enthusiast or a newbie, this guide will walk you through the steps to crochet leaf, creating charming decorations that are perfect for any occasion.
The pattern is free below, or you can purchase the printable, ad-free version from my Ravelry Shop HERE.


1. Jute Twine: Jute twine adds a rustic and natural look to your leaves. You can find it at craft stores or online.
2. Crochet Hook: Choose an appropriate hook size for your jute twine. A 3.5mm hook typically works well.
3. Scissors: For cutting the jute twine and finishing your project.
4. Needle: help you weave in the loose ends of your jute leaves neatly.
5. Hot Glue Gun: to Attach Bamboo Stick to the leaf.
6. Bamboo sticks: 25 centimeters.


Repeat this step with as many leaves as you like, arranging them in a visually pleasing way.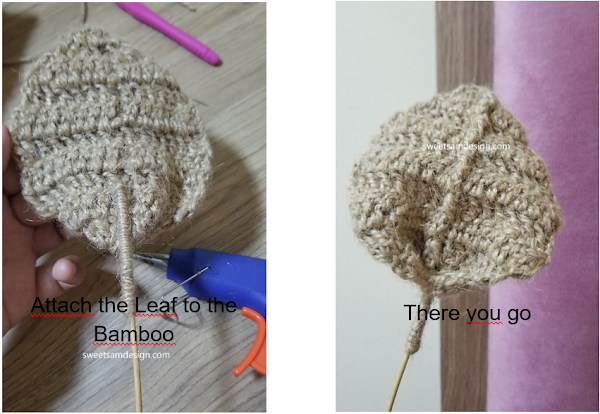
I've used FPdc & BPdc stitches before and explained how to do these stitches in the 3-in-1 crochet bag pattern. If you've never used it before, do not hesitate to check out this link. It's free!
Row 1: ch3 (counted as a dc), turn, 2 dc in 1 st (4th ch from hook), 5 dc, 3 dc in 1 st.
Row 2: ch3 (counted as a dc), turn, 2 dc in 1 st (top of previous row last st), 4 dc, 1 FPdc, 4 dc, 3 dc in 1 st(3rd ch of turning ch3).
Row 3: ch3 (counted as a dc), turn, dc in top of previous row last st, 6 dc, 1 BPdc, 6 dc, 2 dc in 1 st(3rd ch of turning ch3).
Row 4: ch3 (counted as a dc), turn, skip 1 st (top of previous row last st), 7 dc, 1 FPdc, 8 dc.
Row 5: ch3 (counted as a dc), turn, skip 1 st (top of previous row last st), 7 dc, 1 BPdc, 8 dc.
Row 6: ch2, turn, skip 1 st (top of previous row last st), 7 dc, FPdc, 6 dc, dc2tog.
Row 7: ch2, turn, skip 1 st (top of previous row last st), 6 dc, BPdc, 5 dc, dc2tog.
Row 8: ch2, turn, skip 1 st (top of previous row last st), dc2tog, 3 dc, FPdc, 3 dc, dc3tog.
Row 9: ch2, turn, skip 1 st (top of previous row last st), dc2tog, dc, BPdc, dc, dc3tog.
Row 10: ch2, turn, skip 1 st (top of previous row last st), dc, FPdc, dc, ch2, join with sl st in top of beg ch2 of previous row, cut the yarn, leaving a tail.
Use your yarn needle to thread the second tail and weave it through the last few stitches to secure the end. Trim any excess yarn.

• Table Centerpiece: Arrange your jute leaves in a bowl or on a tray to create a rustic centerpiece for your dining or coffee table.
• Garlands: String your jute leaves together to make charming garlands that can be hung on walls, windows, or mantels.
• Gift Wrapping: Attach a jute leaf to a gift as a unique and eco-friendly decorative element.
• Wreaths: Incorporate your jute leaves into wreaths for a natural and welcoming door decoration.
• Wall Decor: Attach a string to your jute leaves and create a lovely wall hanging.
• Gift Embellishments: Add a jute leaf to gift wrapping for a unique and eco-friendly touch.
• Seasonal Decor: Use these leaves to enhance your seasonal decorations, whether for fall, Thanksgiving, or any other occasion.
Crafting these crochet jute leaves is not only a creative endeavor but also a sustainable and beautiful way to add a touch of nature to your home decor. Enjoy the process and let your imagination run wild as you incorporate these charming leaves into your living space. Happy crocheting!

• While jute is highly recommended for its natural look, you can experiment with other twine types for different textures.
2. Is crocheting with jute difficult for beginners?
• It may be a bit challenging for absolute beginners, but with practice, you can master it.
3. How long does it take to crochet one jute leaf?
• The time required depends on your crocheting skills, but on average, it takes about 30 minutes to crochet one leaf.
4. Can I wash my jute crochet leaves?
• It's best to spot clean them with a damp cloth to preserve their shape and texture.
5. Where can I find jute twine for this project?
• You can purchase jute twine at most craft stores or online retailers.
Now that you've learned how to create jute crochet leaves, why wait? Access the world of rustic decor and start crafting today!
The pattern is free below, or you can purchase the printable, ad-free version from my Ravelry Shop HERE.
Eco-Friendly Home Decor with Crochet
In today's DIY crafting world, crocheting has gained immense popularity, and it's not hard to see why. Crocheting is a versatile craft that allows you to infuse your creations with a personal touch. It’s not only a wonderful way to create beautiful handmade decorations but also an opportunity to embrace sustainable materials, and one of the latest trends is using jute. In this tutorial, we'll guide you through crafting a charming crochet leaf pattern using jute, not only eco-friendly but also perfect for adding a touch of rustic elegance to your home decor. These charming leaves can be used to adorn various items, such as table settings, wall hangings, or even as embellishments for gift wrapping. Let's get started!Materials You'll Need
Before we dive into the creative process, let's gather the materials required for this project:1. Jute Twine: Jute twine adds a rustic and natural look to your leaves. You can find it at craft stores or online.
2. Crochet Hook: Choose an appropriate hook size for your jute twine. A 3.5mm hook typically works well.
3. Scissors: For cutting the jute twine and finishing your project.
4. Needle: help you weave in the loose ends of your jute leaves neatly.
5. Hot Glue Gun: to Attach Bamboo Stick to the leaf.
6. Bamboo sticks: 25 centimeters.
Steps & Photo Tutorial: Attach Bamboo Stick to the Leaf
Step 1: Create Crocheted Leaves
Follow the instructions below to create the leaf. Create as many leaves as you like.Step 2: Cut the Bamboo Sticks to Size
Use a pair of sharp scissors or pruning shears to cut the bamboo sticks to your desired lengths (25 cm). Keep safety in mind and cut away from your body.Step 3: Prepare the Jute
Cut a length of jute twine and secure one end to 6 cm from the top of a bamboo stick. This will be your starting point for wrapping the bamboo.Step 4: Begin Wrapping the Bamboo
Wrap the jute twine tightly around the bamboo stick, covering the entire desired length. Ensure that there are no gaps or loose ends. The more evenly you wrap the jute, the better the final result will be.Step 5: Secure the Jute
Once you reach the end of the bamboo stick, secure the jute in place with a small dab of hot glue. Be careful not to burn yourself, as the glue will be hot.Step 6: Attach the Leaves to the Bamboo
Apply a small amount of hot glue to the back of a crocheted leaf and carefully press it onto the wrapped bamboo (3cm). Hold it in place for a few seconds until the glue sets.Repeat this step with as many leaves as you like, arranging them in a visually pleasing way.
The Crochet Leaf Pattern
SKILL LEVEL
The project would be great for a beginner crocheter looking to try Front & post stitches for the first time.SIZE
11 cm / 9 cm.ABBREVIATIONS
ch(s) = chain(s); st(s) = stitch(es); dc = double crochet; FPdc = Front Post double crochet; BPdc = Back Post double crochet.I've used FPdc & BPdc stitches before and explained how to do these stitches in the 3-in-1 crochet bag pattern. If you've never used it before, do not hesitate to check out this link. It's free!
STEP-BY-STEP INSTRUCTIONS : HOW TO CROCHET LEAF?
Make chain 7, leaving a tail of 15 cm.Row 1: ch3 (counted as a dc), turn, 2 dc in 1 st (4th ch from hook), 5 dc, 3 dc in 1 st.
Row 2: ch3 (counted as a dc), turn, 2 dc in 1 st (top of previous row last st), 4 dc, 1 FPdc, 4 dc, 3 dc in 1 st(3rd ch of turning ch3).
Row 3: ch3 (counted as a dc), turn, dc in top of previous row last st, 6 dc, 1 BPdc, 6 dc, 2 dc in 1 st(3rd ch of turning ch3).
Row 4: ch3 (counted as a dc), turn, skip 1 st (top of previous row last st), 7 dc, 1 FPdc, 8 dc.
Row 5: ch3 (counted as a dc), turn, skip 1 st (top of previous row last st), 7 dc, 1 BPdc, 8 dc.
Row 6: ch2, turn, skip 1 st (top of previous row last st), 7 dc, FPdc, 6 dc, dc2tog.
Row 7: ch2, turn, skip 1 st (top of previous row last st), 6 dc, BPdc, 5 dc, dc2tog.
Row 8: ch2, turn, skip 1 st (top of previous row last st), dc2tog, 3 dc, FPdc, 3 dc, dc3tog.
Row 9: ch2, turn, skip 1 st (top of previous row last st), dc2tog, dc, BPdc, dc, dc3tog.
Row 10: ch2, turn, skip 1 st (top of previous row last st), dc, FPdc, dc, ch2, join with sl st in top of beg ch2 of previous row, cut the yarn, leaving a tail.
FINISHING
After finishing the leaf, fold the leaf in two like shown in the following photos. Use your needle to thread the first tail and pass it through the stitches'chain, to attach them. Cut off any excess thread.Use your yarn needle to thread the second tail and weave it through the last few stitches to secure the end. Trim any excess yarn.
Using Your Crochet Jute Leaves
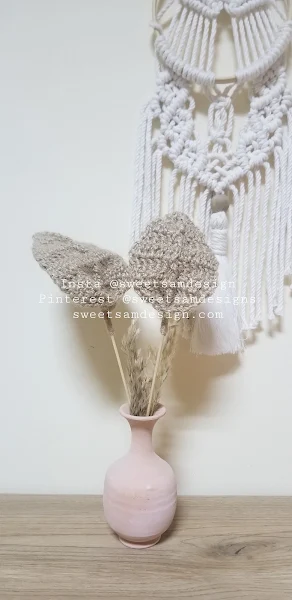
Once you've created several jute leaves using this pattern, you can use them for various decorative purposes:• Table Centerpiece: Arrange your jute leaves in a bowl or on a tray to create a rustic centerpiece for your dining or coffee table.
• Garlands: String your jute leaves together to make charming garlands that can be hung on walls, windows, or mantels.
• Gift Wrapping: Attach a jute leaf to a gift as a unique and eco-friendly decorative element.
• Wreaths: Incorporate your jute leaves into wreaths for a natural and welcoming door decoration.
• Wall Decor: Attach a string to your jute leaves and create a lovely wall hanging.
• Gift Embellishments: Add a jute leaf to gift wrapping for a unique and eco-friendly touch.
• Seasonal Decor: Use these leaves to enhance your seasonal decorations, whether for fall, Thanksgiving, or any other occasion.
Crafting these crochet jute leaves is not only a creative endeavor but also a sustainable and beautiful way to add a touch of nature to your home decor. Enjoy the process and let your imagination run wild as you incorporate these charming leaves into your living space. Happy crocheting!
FAQs
1. Can I use other types of twine instead of jute?• While jute is highly recommended for its natural look, you can experiment with other twine types for different textures.
2. Is crocheting with jute difficult for beginners?
• It may be a bit challenging for absolute beginners, but with practice, you can master it.
3. How long does it take to crochet one jute leaf?
• The time required depends on your crocheting skills, but on average, it takes about 30 minutes to crochet one leaf.
4. Can I wash my jute crochet leaves?
• It's best to spot clean them with a damp cloth to preserve their shape and texture.
5. Where can I find jute twine for this project?
• You can purchase jute twine at most craft stores or online retailers.
Now that you've learned how to create jute crochet leaves, why wait? Access the world of rustic decor and start crafting today!


No comments:
Post a Comment