
Hey there, dear crochet enthusiasts! I'm absolutely thrilled to introduce you to a brand-new crochet pattern today: the Flamingo.
I must say, creating this piece was a true joy. I was captivated by how elegantly the pattern brought out the graceful curves of the flamingo's neck. While I opted for a pristine white look, envision how striking it would be in shades of pale pink or vibrant hot pink!
Are you ready to dive into the world of crochet artistry and create your very own crochet flamingo? This delightful amigurumi pattern is here to make your crafting journey an absolute breeze. Plus, the finished flamingo makes for a perfect gift on various occasions, be it birthdays, baby showers, or any other special event.
Let's embark on this creative adventure together! Or, if you're short on time right now, go ahead and Pin this for later or explore our online shop for more crafting inspiration!

The pattern is free below, or you can purchase the printable, ad-free version from my Ravelry Shop HERE
The mini crochet flamingo would be easy to make with this pattern ! Easy-to-follow, explained very well, and certainly will give you a lovely result, photos and step-by-step instructions will help you make your own Flamingo !

Crafting Your Flamingo: A Step-by-Step Guide
Size
8 cm/ 20 cmGauge
Not important for this projectMaterials You'll Need
Before we delve into the intricate stitches, let's gather the materials: - Crochet Hook: 2.5 mm.- Yarn: three cotton yarn colors.
A: Champagne White,
B: Raspberry Pink,
C: Pure Black.
- Scissors,
- Needle,
- Macrame cord (60 cm),
- Polyfill.
You can crochet from any yarn using the referenced hook for that yarn. The only difference will be in size.

Stitching Up Your Flamingo
Let's get familiar with some essential abbreviations: - A, B, C = Color A, B, C;- beg = beginning ;
- st(s) = stitch(es);
- mc= magic circle;
- sl st = slip stitch;
- ch(s) = chain(s);
- dc = double crochet;
- FPdc = front post double crochet;
- FPdc2tog = front post double crochet 2 together;
- mm = millimeters; cm = centimeters ;
- V = dc, ch 1, dc all into the same stitch.
Mastering the FPdc Stitch
If you haven't used the FPdc stitch before, no worries! Check out our free guide here for a step-by-step tutorial. I've used FPdc stitch before and explained how to do it in the 3-in-1 crochet bag patternThe Crochet Flamingo Pattern
Now, let's dive into the heart of the pattern and create your adorable flamingo buddy.Step 1: Crocheting the Flamingo Body
With A, make mc,Round 1 : ch 3, dc, ch, dc 3, ch, dc, sl st in top of beg ch-3.
Round 2 : ch 3, FPdc, V, FPdc 3, V, FPdc, sl st in top of beg ch-3.
Round 3 : ch 3, FPdc 2, V, FPdc 5, V, FPdc 2, sl st in top of beg ch-3.
Round 4 : ch 3, FPdc 3, V, FPdc 7, V, FPdc 3, sl st in top of beg ch-3.
Round 5 : ch 3, FPdc 4, V, FPdc 9, V, FPdc 4, sl st in top of beg ch-3.
Round 6 : ch 3, FPdc 5, skip ch st, FPdc 11, skip ch st, FPdc 5, sl st in top of beg ch-3.
Round 7 : ch 3, FPdc2tog, FPdc 6, FPdc2tog, FPdc, FPdc2tog, FPdc 6, FPdc2tog, sl st in top of beg ch-3.
Round 8 : ch 3, FPdc2tog, FPdc 4, FPdc2tog, FPdc, FPdc2tog, FPdc 4, FPdc2tog, sl st in top of beg ch-3.
Round 9 : ch 3, FPdc2tog, FPdc 2, FPdc2tog, FPdc, FPdc2tog, FPdc 2, FPdc2tog, sl st in top of beg ch-3.
Round 10 : ch 3, FPdc2tog, FPdc2tog, FPdc, FPdc2tog, FPdc2tog, stuff with polyfill, then make sl st in top of beg ch-3.
Round 11 : ch 2, sl st in top FPdc st of previous round.

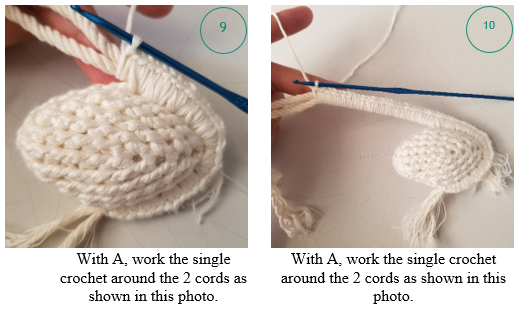
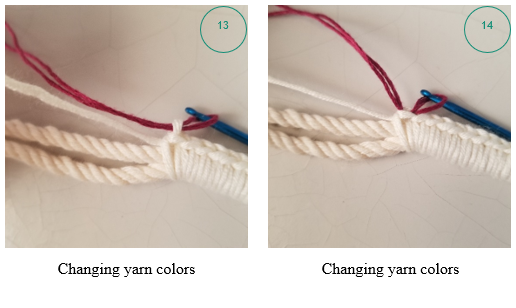
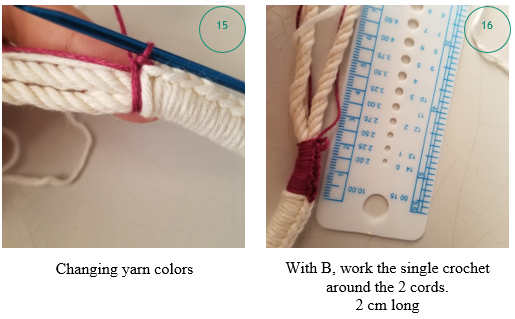
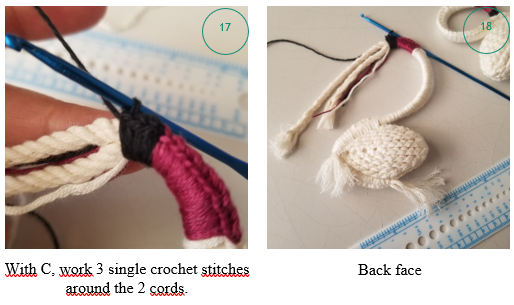
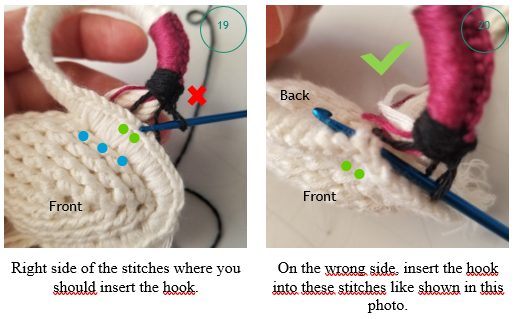
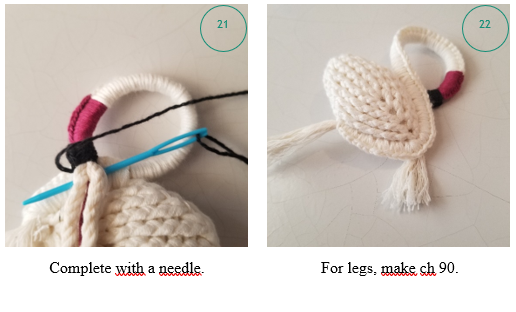
Step 2 : Crocheting the Flamingo Neck Head & Legs


Finishing Touches
Don't forget to weave in any loose ends and consider blocking if needed to enhance the final look of your masterpiece.
Copyright Matters
Please note that this is an original, copyrighted pattern, so kindly refrain from editing, sharing, or selling it. However, you're more than welcome to sell the finished creations that you craft using this pattern. We do appreciate it when you include a link back to this pattern in your listings. I may accept forms of cash advertising or sponsorship as well as free product to use in my projects.
Ready to Begin?
Get started on your crochet adventure with this wonderful flamingo pattern. And remember, if you encounter any hiccups along the way, please don't hesitate to reach out to us for assistance.Before we wrap up, if you've enjoyed this pattern, be sure to explore our other delightful patterns and follow us on social media for the latest updates, exclusive deals, and crafting inspiration. Find us on Pinterest, Instagram, Facebook, and subscribe to our newsletter . Wishing you the very best on your crafting journey! Happy crocheting!


No comments:
Post a Comment